Yesterday I saw a license plate that simply said, "UNLEASH." If I want to unleash my creativity and have it flourish as an artist, I have got to give it the room. Lives can be very, very cluttered with all sorts of things that do not serve us. If you simply keep what enhances your life right now, you could free up a lot of physical and emotional clutter. Some quick tips can be found here: Zen Mind: How To Declutter.
As creative people, we often keep things around that we "might use" in a project. This is great if these things are stored in a way that does not hinder our work in the meantime. Otherwise this is just another barrier to being successful. There are plenty of obstacles beyond our immediate control- we don't need to add to them by creating more barriers! In a blog post I recently read, the guest author was talking about how to have less stuff by wanting less stuff. He wasn't just saying "get rid of your stuff." He was supplying an additional tool to facilitate the change. Here is the link: How To Want Very Little.
Perhaps you have determined that you really do need to keep most of your stuff, but it could be stored in a more manageable way. For a more in depth and systematic way to organize, Organizing From the Inside Out by Julie Morgenstern is one of the very best books on organizing. I'll write some more specifics about the book in a later post.
Please contribute your thoughts and suggestions by clicking 'comments.'
Thursday, December 17, 2009
Tuesday, December 15, 2009
Ten Steps to Photographing Artwork
Below is the method I use to photograph 2 dimensional work. I start with an unframed piece. Drawings or works on paper can be taped to a support.
- Set up outside on a bright overcast day with no or few cast shadows
- Arrange piece on a black background
- Level the piece
- Set up camera on tripod at center of piece at closest distance to fill the frame.
- Turn off flash
- Adjust camera settings according to built-in or separate light meter
- Use highest mega pixel setting available & adjust any special settings- know your camera's capabilities*
- Level the camera
- Take photo with timer or remote button release
- Crop/Adjust image size with computer program
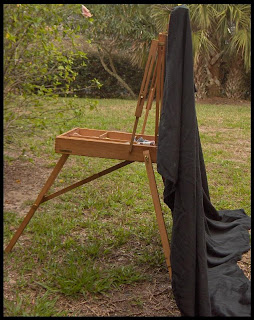
For small pieces I use a French easel to secure the piece. For the black background I use a black cotton sheet. Some people use black velvet. I use a small level on two sides of the stretched canvas to level it (top or side and front or back). The camera is leveled the same way. I have eyeballed or estimated the left and right side of the canvas to be same distance from the camera (or parallel to the camera). For larger pieces this would be measured for accuracy. If needed, I then use a program on a pc to adjust the image size and to center it.
* I wrote about some special settings here: Photographing Artwork 2.
Have I forgotten anything? What would you add?
Please post your contributions by clicking 'comments' below.
Subscribe to:
Comments


